Purchase Requisition (PR) Release Strategy – Basic Concept
Purchase Requisition (PR) is an internal purchasing document in SAP ERP. A user creates a PR to notify the
responsible department, usually the purchasing/procurement department, about his requirement of materials and/or external services. In SAP ERP system, the user can track the status of the PR whether it has been processed or not.
PR must contain information about quantity of a material or a service and the required date. It can be created directly (manually, through ME51N T-code) by a person or indirectly by another SAP component (such as material requirement planning/MRP, maintenance order of Plan Maintenance/PM module, production order of Production Planning/PP module).
PR can be processed to be an external purchasing document (such as Purchase Order/PO) or internal purchasing document (such as Stock Transport Order/STO).
In SAP ERP, PR can be processed directly to be PO/STO or must be approved /released before it can be processed to be PO/STO.
If we want that PR must be approved /released before it can be processed to be PO/STO, we must set up a release procedure for that PR.
The first thing to do in setting up a release procedure for a PR is to decide whether we will approve/release that PR for:
· Overall PR
If we release a PR, all items in that PR will be released and then can be processed to be PO/STO. If we don’t release it, none of its item will be released nor can be processed to be PO/STO.
Or,
· Item-wise
We must release item per item of a PR in order to make them ready to be processed to be PO/STO. If we don’t release some of PR items, the other items can be released and processed to be PO/STO.
In an SAP ERP client, all PRs with a particular PR Document Type can use just one of the above options. If we have more than one PR Document Type, we can set some of them use “Overall PR” release procedure and others use “Itemwise” release procedure, depends on our business process needs.
We can set the option in the process “Define Document Type” of Purchase Requisition that can be accessed by “OMEB” T-code or through menu paths of “SPRO” T-code: Materials Management – Purchasing – Purchase Requisition – Define Document Type, as per below image
If we want a PR Document Type uses “Overall PR” release procedure, we must tick the “Overall release of purchase requisitions (OverReqRel)” indicator. If we don’t tick that indicator, it means that PR Document Type will be released with “Item-wise” procedure.
The next thing to do is to determine the PR criteria/parameters that must be approved / released by specific person. For example:
PR of raw material that has value less than USD 50,000.00 can be released by operational manager. PR of that item that has value USD 50,000 or more must be approved by operational manager and operational director. PR for production equipment must be approved by Asset Manager and operational director, whatever its cost.
In SAP ERP there are two release procedures that we can choose:
1. Release Procedure without classification
This procedure can only be used for “item-wise”. It can’t be used for “Overall PR”. The criteria that can be used with this procedure to distinct the PR approval processes are limited to: PR item value, material group, account assignment, and plant. We can’t use this procedure if we want to distinct the PR approval process by other criteria such as Purchasing group, document type, storage location, or something else.
The only reason we should use this procedure is its simplicity. But if we want more flexibility in determining the PR release procedure we should use the other option. In this article we won’t explain the “Release Procedure without classification” in details. We will explain the other option (Release Procedure with classification) in details.
2. Release Procedure with classification
With this procedure, we can choose whether we want to release the PR for “Overall PR” or “item-wise”. And the main reason why we should use this procedure is because we can choose more criteria to distinct the PR approval process. The criteria are not limited to PR item value, material group, account assignment, and plant only.
SAP ERP has provided a communication structure “CEBAN” that we can use to define criteria/parameters to determine the PR approval process. Each field in “CEBAN” can be used as criteria/parameter. These parameters must be defined in SAP ERP as a “Characteristic”. Some “characteristics”, that are used as parameters to determine a release condition for a release strategy, are grouped to a “Classification”.
Step by step guide to configure SAP PR Release Strategy
Case study scenario
A company has four plants (A000, B000, C000, and D000). Each plant has a stock controller and plant manager. Each plant produces specific sub-assembly and products, and they can be transferred from one plant to another. A000 also acts as the Head Office where Asset Manager and Operational Director perform their tasks.
All PRs created need to be released/approved by specific person according to the following conditions:
1. Because they usually create a Stock transfer request/STR (PR with item category “U: Stock Transfer”)
that contains a lot of items, they decide that STR needs to be approved by its supplying-plant stock-
controller with “overall PR” procedure (header level).
To make this procedure runs well, the company has an internal policy that an STR can contain only items
with same supplying plant. If someone needs STR from two supplying plant, he/she must create two
different PR. They also have created a PR document type that specific for STR. That document type only
allows “U: Stock Transfer” item category.
2. PR for external procurement (PR with item category other than “U: Stock Transfer”) needs to be
approved with “item-wise” procedure (item level). They created another PR document type that does not
allow “U” item category. The release strategy of the PR depends on the account assignment and the total
item value.
o Item with “standard (inventory)” account assignment that has total value less than USD 10,000 needs to
be approved by its stock controller.
o Item with “standard (inventory)” account assignment that has total value USD 10,000 or more needs to be
approved by its stock controller and plant manager.
o Item with “Asset” account assignment needs to be approved by Asset Manager whatever its total value
and wherever it’s requested.
o Item with “Cost Center” account assignment that has total value less than USD 5,000 needs to be
approved by plant manager.
o Item with “Cost Center” account assignment that has total value USD 5,000 or more needs to be
approved by plant manager and operation director.
Based on the above scenario we are asked to configure the PR release procedure.
PR Release Strategies Matrix
From the above scenario we know that we have to use both “Overall PR” and “item-wise” procedures. We also know the criteria/parameters that determine the release strategy (who has the authorization to release/approve PR). To make it easier to understand, we can make a release strategy matrix like the following tables:
Each row in the above “Release Strategies” tables is a release condition, which if a PR meets its criteria then that PR will be assigned its associated release strategy. For instance, if a PR meets criteria at the first row of “Release Strategies” table for “item-wise” release procedure, then that PR needs to be approved by Stock Controller A.
The one thing that must be carefully considered in PR release procedure configuration is to ensure that all possibilities of PR parameter’s value combinations (all release conditions) have been anticipated by PR release strategies. Once we determine the release conditions, if there are PRs which don’t meet any conditions, then that PRs will be considered that they don’t need any approval/release processes. So, they will be available to be processed to the next step (to become a PO or STO).
If we don’t want that happen (if we want all PRs needs to be approved), we have to ensure that each PR created must meet one of the release conditions. In our scenario, we can ensure that, for example, by creating a PR document type for STR that only allows “U: Stock Transfer” item category; and another PR document type that does not allowed “U” item category and only allows “Standard”, “A: Asset”, and “K: Cost center” account assignment to each item category.
Prerequisites
Because we use both “Overall PR” and “item-wise” release procedure, we must distinct the document type of PR for each of them. So, we must create a PR document type for “Overall PR” release procedure, such as ZST, and another PR document type for “item-wise” release procedure, such as ZNB. We can create PR document type by copying from SAP standard PR document type (NB) with “OMEB” T-code or through menu from “SPRO” T-code: Material management – Purchasing – Purchase Requisition – Define Document Type. We must tick the “Overall release of purchase requisitions” indicator for ZST document type.
SAP PR Release Strategy configuration
Edit characteristics
Characteristics are criteria/parameters that determine the release condition of release strategies of PR. If a release condition is satisfied, the associated release strategy is assigned to the PR.
We can create characteristics from fields that have been provided by SAP in “CEBAN” communication structure that has been explained in the chapter 1.
From the matrix that has been created before at the 2.2 section, we know that characteristics that qualified for our needs are:
· Item category (for Overall PR release)
· Supplying plant (for Overall PR release)
· Account Assignment (for Item-wise release)
· Total item value (for Item-wise release)
· Plant (for Item-wise release)
The corresponding fields of CEBAN are:
· PSTYP: Item category in purchasing document
· RESWK: Supplying (issuing) plant in case of stock transport order
· KNTTP: Account assignment category
· GSWRT: Total value of item
· WERKS: Plant
We can create characteristics: ZCEBAN_ PSTYP, ZCEBAN_ RESWK, ZCEBAN_ KNTTP , CEBAN_ GSWRT , ZCEBAN_ WERKS (or anything else name you like).
The following SAP screenshots show step by step how to create a characteristic:
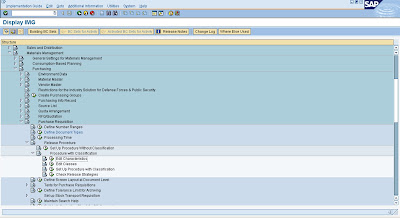
· Through “CT04” T-code or menu from “SPRO” T-code: Material Management – Purchasing – Purchase
Requisition – Release Procedure – Procedure with Classification – Edit Characteristics
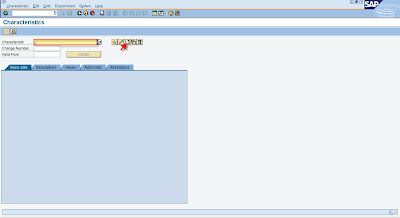
Input this field:
- Characteristic
Characteristic name: Name that uniquely identifies a characteristic.
We make these 5 characteristics one by one: ZCEBAN_ PSTYP, ZCEBAN_ RESWK, ZCEBAN_ KNTTP , ZCEBAN_ GSWRT , ZCEBAN_ WERKS.
· Push the “create” button as pointed by red arrow on the above image.
· Go to “addnl data” tab
Input these fields:
- Table name: “CEBAN”
- Field name: the corresponding field in “CEBAN” communication structure of the characteristic that we want to create.
· Go to “Basic data” tab.
Description and data type are copied from “CEBAN” communication structure.
Input these fields:
o Value assignment indicator: “Multiple values” if we want more than one value can be assigned to a
characteristic in one release strategy (that will be explained later), or “single-value” if we want only one
value can be assigned to this characteristic in one release strategy.
From the release strategy tables of the release strategy matrix we’ve defined before (in 2.2 section), it
seems that only “plant” column (parameter/characteristic) which have more than one values in a row (in a
release strategy scenario). It’s on the last row of the tables, the release strategy scenario of PR item
with “Asset” account assignment from all plants (A000, B000, C000, D000) which needs to be
approved by Asset Manager.
So, we must choose “Multiple values” for ZCEBAN_WERKS (plant) characteristic, because we must
assign all the plants as the values of the characteristic to that release strategy scenario. For other
characteristics, we can choose “Single-value” because we only assign one value to the characteristic in
one release strategy scenario.
o Interval vals allowed: This indicator defines whether we can enter an interval as a value for a numeric
characteristic. For “total value of item/ZCEBAN_GSWRT” characteristic we should tick this indicator.
For other four characteristics we don’t need this indicator as their data types are not number/currency.
· Go to “Values” tab.
Input the values of the characteristic we make. We have determined these values in PR Release Strategies Matrix, but for some fields (such as PSTYP), we must map them to the values that store by SAP and its table.
ZCEBAN_ PSTYP values: 0 (for standard item cat.); 7 (for U: Stock Transfer item cat.)
ZCEBAN_ RESWK values: A000; B000; C000; D000
ZCEBAN_ KNTTP values: A (Asset); K (Cost Center); blank (Standard)
ZCEBAN_ GSWRT values: >=0; <5000; >=5000; <10000; >=10000
ZCEBAN_ WERKS values: A000; B000; C000; D000
· Go to “addnl data” tab
Make sure that “Not ready for input” indicator is not selected.
Click the “Save” button, and make other characteristics.