Thursday, 29 September 2011

SAP Tips and Tricks


  • Logging on without being authorized
Client 066 usually exists in a SAP system because of EarlyWatch services. Often this client does not have master users. If it is true, anyone can log into the system using the client 066, user SAP*, and password PASS. Enjoy yourself.

  • Special copy and paste
Click on the area and press CTRL+Y. It allows you to copy many lines at once and paste them afterwards.
  • Long messages on footer
Click on the message and hold the mouse button. After moving the mouse to the left side.
  • Direct input logs
The transaction BMV0 (direct input logs) shows all direct input logs.
  • Graphics on SAPscript
The program RSTXLDMC can be used to upload graphics (file extension .tif on PC files) into individual standard text.

  • Adding icons
The include «ICON» can be easily used in your programs. All icons can be checked through the transaction ICON. Sequences of characters begin and finish with the symbol @. Even plain files under operating system can contain those strings.
  • Adding symbols
The include «SYMBOL» can be easily used in your programs. It makes available a great number of symbols.
  • Filling up an empty date field quickly
Strike the key F4 (or click on matchcode symbol) and press ESCAPE. The current date is automatically set.
  • Setting up module FI/CO without using IMG
Almost all parameters can be set using the transactions ORFA (Asset Accounting), ORFB (Financial Accounting), and ORKS (Cost Center Accounting).
  • Deleting cost elements and cost centers
Since they have no postings you can use the transaction KA04 for deleting cost elements and KS04 for deleting cost centers.
  • Displaying check object when not authorized
Soon after the lock try to access the transaction SU53. It reports the last objects verified and also the respective values.
  • Table analyses between two systems
The contents of a table between two systems can be checked through the transaction OY19.
  • Correction and transport system
             The transaction SE10 provides the easiest way to manage any request/transport and         
             corrections
Wednesday, 28 September 2011

This ABAP rings the bell on any chosen pc, that has a sapgui connected to SAP


REPORT SAPLGRAP.
************************************************************************
* This program seds an audio alert to a specific user's frontend
* server. The program needs a pre-registered rfc program listening on
* every pc. The rfcexec can be started from the windows automatic
* startup like this:
* rfcexec -a100.100.100.100.rfcexec -ggatewayhostname -xsapgwXX
*                  ^                        ^
*            IP of the pc        IP of the gateway host
************************************************************************

* Get the terminal, that belongs to the user
start-of-selection.
  data: user value 'IMRE'.
  DATA: OPCODE TYPE X VALUE 2.
  DATA: BEGIN OF USR_TABL OCCURS 10.
          INCLUDE STRUCTURE UINFO.
  DATA: END OF USR_TABL.

  CALL 'ThUsrInfo' ID 'OPCODE' FIELD OPCODE
    ID 'TAB' FIELD USR_TABL-*SYS*.

* Get the corresponding IP address
  data: arp_command(30) value '/usr/sbin/arp',
        BEGIN OF TABL OCCURS 0,
        LINE(200),
        END OF TABL,
  ip_address(100).

  read table usr_tabl with key bname = 'IMRE'.
  if sy-subrc <> 0. write: 'There is no such a user logged in'.
  exit.endif.
  arp_command+14 = usr_tabl-term.
  CALL 'SYSTEM' ID 'COMMAND' FIELD arp_command
               ID 'TAB'     FIELD TABL-*SYS*.
  read table tabl index 1.
  shift tabl right up to ')'.
  shift tabl right deleting trailing ')'.
  shift tabl left up to '('.
  shift tabl left deleting leading '('.

* Get the systems that has been registered on the gateway.
  data: begin of connected_systems occurs 10.
          include structure GWY_SYSTEm.
  data: end of connected_systems.

  call function 'GWY_READ_CONNECTED_SYSTEMS'
  exporting
   gwhost = 'optima'
   gwserv = 'sapgw00'
  tables
   CONNECTED_SYSTEMS = CONNECTED_SYSTEMS.

* Get the registrated entry for the user's ip.
  data: host_string(40).

  loop at CONNECTED_SYSTEMS.
    if CONNECTED_SYSTEMS-ADDR1 = tabl and
       CONNECTED_SYSTEMS-SYSTYPE = 'REGISTER_TP'.
       host_string = CONNECTED_SYSTEMS-tpname.
      exit.
    endif.
  endloop.
  if host_string is initial. write: 'No registered RFC server'.
  exit.endif.

* Create a new destination in RFCDES
  tables: rfcdes.

  rfcdes-rfcdest = 'ZTTTT'.
  rfcdes-rfctype = 'T'.
  rfcdes-rfcoptions = 'H=%%RFCSERVER%%,N='.
  rfcdes-rfcoptions+19 = host_string.
  rfcdes-rfcoptions+59 = ','.
  condense rfcdes-rfcoptions NO-GAPS.
  modify rfcdes.
  if sy-subrc <> 0. write: 'Unsuccessfull modification'.
  exit. endif.
  commit work.

* Call the alert with the new destination
  DATA : BEGIN OF RET OCCURS 10,
          TEXT(80),
         END OF RET .
  data: command(256) value
        'sndrec32.exe /play /close c:/winnt/ringin.wav'.
  CALL FUNCTION 'RFC_REMOTE_EXEC' DESTINATION 'ZTTTT'
                                   EXPORTING
                                     COMMAND = COMMAND
                                   TABLES
                                     PIPEDATA = RET.

* Delete the rfc destination
  clear rfcdes.
  select single * from rfcdes where rfcdest = 'ZTTTT'.
  delete rfcdes.
  if sy-subrc <> 0. write: 'Unsuccessfull delete'.
  exit. endif.
  commit work.

Friday, 23 September 2011

How to Lock or Unlock a Client in SAP


The procedure to lock amd unlock a client in SAP,very rarely we need to use it..But stil u should know so follow these simple steps…


1 To lock or unlock a client in R/3 System, run the following function modules in
transaction se37
2. SCCR_LOCK_CLIENT ( to lock the client)
3. SCCR_UNLOCK_CLIENT (to unlock the client)

Run these functions with a client input which is to be locked/unlocked. This function set flag ” Client is locked temporarily for client copy” in client maintenance menu.The client will be available for users DDIC and SAP*. If any other user tries to log in, system gives message that ‘ Client locked temporarily’.
To unlock the client

1. Run transaction SE37
2. Enter the function module as SCCR_UNLOCK_CLIENT
3. press F8 or test run (single run).
4. Specify the client and execute(F8).
Follow similar procedure for locking the client…

Wednesday, 21 September 2011

Run OS Commands from SAP GUI

What a interesting piece of information now you can run os commands from SAP GUI.

Just run report RSBDCOS0 in SA38 and enjoy .

You can change working directory and all.Now no need to ask sysadmin to give password also . :)

Hope all basis will enjoy now..Specially junior guys..

Tuesday, 20 September 2011

SMS setting in SAP


The procedure/configuration to send the message from SAP .
Go to T-code SCOT
You will see screen like this
Click on PAG and then create button on same screen
Provide detail as:
NODE: HTTP
Description: SMS Integration
Select HTTP Node
Provide URL provided by third party
Keep password this field blank as we have provided the same in URL itself
Provide maximum length of character allowed by service provider
Provide field address area as *
Provide the time in minutes or hours (depends )
Select Node is ready to Use
Now you can see HTTP service
HTTP Virtual host Configuration
Go to T-code SICF and select default host and then New Sub element
In Log-on tab provide user name and password for same client
Click on HANDLER List tab and provide the handler as shown below
Finally activate the service
HTTP Client proxy setting:
In same T-code SICF
In HTTP Log tab provide proxy detail
Maintain pager Service
Go to Client 000 and run t-code SA14
Provide detail as shown below
Pager Serv: BAL
Use :SMS Service
Go to SPRO in your customizing client
SAP Web Application Server  Basis Services Address Management Define pager services
Provide detail
Pager serv : SMS
Pager service : SMS
Use : SMS Service
Composing a SMS
Go to T-code SBWP
Click on New Message
To monitor the process go to T-code SCOT here you can see 1 in waiting as we have given time for 2 minutes it will send the message after 2 min only
Go to T-code SOST and here we can check the status of message
That’s all now you can check you mobile phone for Message :)

Monday, 19 September 2011

Send Purchase Order by mail to vendor in SAP

This blog explains the steps involved in SAP ECC to send purchase order by email to a vendor as an attachment. Sending Purchase order by email to a vendor is called as "External Send" in SAP. Follow this Steps


1. mail address of the vendor should be maintained in the vendor master data while creating the vendor using Transaction code XK01, if vendor is already created maintain the email address using Transaction code XK02.

2. Maintain email address in your "own data", to ensure that the process has a sent from your email address (system>User Profile>Own Data).
Note: It is not possible to change the vendor email address permanently with standard purchase order transaction code ME21N or ME22N, we can maintain temporary only, for permanent change use transaction codes XK02 or MK02.

3. For output type default values, a communication strategy has to be maintained in the customization.
Menu path for communication strategy: (SPRO >IMG >SAP Web Application Server > Basic Services >Message Control > Define Communication Strategy). Here default value is communication structure is CS01 and communication type is INT (email), after configuration of relevant communication structure and communication type, we can find these entries in table TCSTRP.

4. Use standard SAP Program "SAPFM06P" FORM routine "ENTRY_NEU" and form "MEDRUCK" as processing routines for output type (ex NEU-Purchase order). For additional functionalities copy this program and smart form in to Z Program and Z form (Ex: Z_PO_PRINT and Z_PURCHASE_ORDER) and maintain these against output type (Ex: ZNEU-PO Email) by using transaction code NACE, For subject of the email goto Mail Title and Texts. In title give PO No. &EKKO-EBELN&

5. In order trigger the output type automatically in PO maintain the condition record using transaction code MN04 for output type, use medium as '5' (External send).

6. Use SCOT transaction code to trigger the output manually In SCOT transaction under INT double click on node SMTP and maintain SMTP connection.

  Mail Host: (IP address of the mail server)
  Mail Port :25
  Code Page: 4110 unicode UTF-8.(Example)
  Click on SET tab against the Internet check box and maintain
  SAPscript/Smart Forms: PDF or TXT as per requirement.

7. Status of the External send document can be seen in transaction code SOST.

Plz follow & Comment....

Saturday, 17 September 2011

Change history settings in SAP


Copy characteristics hierarchy

Many times in the past, other application support teams and even business teams had requested for soft copy of the characteristic hierarchy, so that they can replicate information in the hierarchical way SAP is showing. 


The following tables store the details of the tree structure TKCHH SAP-EIS: Hierarchy header TKCHHT SAP-EIS: Texts for hierarchy header TKCHN SAP-EIS Hierarchy nodes TKCHNT SAP-EIS: Hierarchy node texts TKCHV SAP-EIS: Hierarchy variants TKCHVT SAP-EIS: Description of hierarchy variants TKCHW SAP-EIS: Hierarchy data The tree structure can be replicated using the TKCHW table, which stores the tree relationship.

How to use MS Word Mail merge for mass update in SAP


This article explains the step by step, a simple and effective trick to do mass updates/creations on SAP configurations. In many cases this can potentially save couple of days. Conceptually it is very simple. Many IT professionals know how to use mail merge. For an SAP consultant, BDC is not a news. This will explain the steps to create a BDC session using recording and mail merge. 1. Prepare the dataFirst step is to prepare your data. It is easy to explain using an example. We will use IMG configuration for MRP Controller. We will use Name and telephone field of the MRP controller. The data to be created will be created as an excel sheet. Let us save this file as mrpc.xls

Next step is to create the recording. Before proceeding, decide your naming conventions. This will help you in troubleshooting and analysis. We will be creating 3 files, The basic recording as a text file The mail merge document as a word document Finally the merged bdc session as a text file. I use r_xxxx .txt (xxxx tcode or some other meaningful name) for basic recording, mm_xxxx.doc for the mail merge document and bdc_xxxx.txt for the merged session. To create the recording, you need to know the tcode. Most of the consultants are used to navigating using menu. Some experienced consultants know the tcodes by heart. It is easy to find the tcode. In the IMG screen>Additional Information>Additional Information>Display Key>IMG Activity. This will display the tcode of the specific IMG activity. 
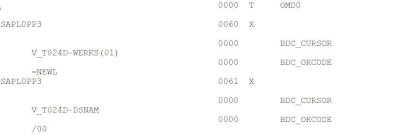
Another point before actually proceeding to create the recording, it is better to create one MRP controller normally to create the transport request. If the transport request is already created or if you can create the transport request manually then this is not required. Create the recording using the tcode SHDB. IN SHDB>New Recording, enter recording name and the tcode OMD0. Click Start Recording. You will get the actual MRP Controller maintenance screen. Create a new MRP Controller. When the transaction is completed, you will see the recording in the SHDB screen. Export the transaction to the desktop as a text file r_OMD0.txt. Next step is to prepare the mail merger document. Open r_omd0.txt in ms word. You will see the text wrapped in 2 lines looking clumsy. 
Not to worry. Select File>page Setup. Choose paper size A3, orientation landscape and all margins as 2.5cm. EDIT>Select all and change font size to 6. If the display is very small, change zoom setting to 150%. 

2. Mail Merge With the file in the MS Word, select menu option tools>mail merge. Click on create and select form letters. Select active window to use the current document. The Get data button will become active now. Click get data>open data source and select your excel file you created in step 1 (mrpc.xls). A window will appear with the button . Click on this button will take you to the main document. In this step you have to link the excel sheet fields to the place in document, so when the mail merge is executed, the main document contents are repeated for each record in the excel sheet replacing the linked field with values from excel sheet. The mailmerge tool bar should appear. If not select view>toolbars>mail merge. All the fields that needs to be linked will be in the right hand side end in the recording. Highlight the plant number, click on from the tool bar and select plant. The plant number will be replaced with <>, indicating that it is a merge field. Like this insert the merge fields where ever required. Sometimes the same fields might appear in multiple lines. The merge field needs to inserted in all the lines. Now click on button, enter the parameters in the window and click in the window. A new document window will open and create the merged document. Save this file as text document. You can use md_omd0.txt as the naming convention.
3. Run the Update Login to configuration client and run tcode SHDB>new recording. Enter a name in recording field and leave the transaction code field blank and click on green tick. Click on icon to import the recording. In the file open dialog select the text file created in step 2 (md_omd0.txt). Click to run the bdc session.

Friday, 16 September 2011

How To Change Title of SAP Transaction Code

Sometimes, you may need to change the Title of the SAP Transaction code to a more meaningful one.
The steps are as follows:
Goto tcode SE63 ,On the top left Menu of the screen – Click Translation —> Short texts – –> Transactions
For example, assuming you want to change the title of the t-code su10 from user maintenance: Mass changes Initial Screen to Mass User changes . On the first screen, fill in the following information:
Transaction code – SU10
Source Language – English
Target Language – English
To change the Title, click the Edit button. On the second line (the one in dark yellow), type in the Title (For e.g. Mass User changes) you want for the transaction code. Click the Save button
Now, call up the transaction code /nSU10 again and you should be able to view the new Title

SAP Logon screen or SAP wallpaper


step 1: save a image in gif format with z or y intial letter
step 2: goto tcode smw0
step 3: select Binary data
step 4: click find button
step 5: click execute
step 6: goto settings > maintain MIME type

step 7: click create > type =*.gif >extension =.GIF click ok and then go back
step 8: click create >OBJ Name=name of image with extension>desc=any>click import
step 9: select image click local object
step 10: tcode sm30
table name >SSM_CUST click maintain
enter parameter RESIZE_IMAGE value =no
START_IMAGE value =name of object name / image name with extention (in capiatl letter)
step 11: click save
step 12: logof ans login again and see

Please comment

Thursday, 15 September 2011

SAP Splash Screen


When users log on SAP, you may want to setup a splash screen to display information about the usage of the system and which clients are available for which purpose. The following procedures have been adopted successfully with SAP release 4.6Cand up.
This can be accomplished by following these steps:
a) Use transaction SE61
b) Select Document Class 'General Text'
c) Enter name 'ZLOGIN_SCREEN_INFO' 
d) edit your messages and icons (see syntax in the example below)

 
Good luck

Generate ABAP reports in minutes


Wednesday, 14 September 2011

SAP workflow tutorial

Please Comment

SAP OSS Notes

What are SAP Notes? Where do I can find them? How to use it?


OSS is the online service system provided by SAP for support activities, like sometimes some issues which we can't resolve, then we have to send it to SAP, it is only sent through OSS and then SAP will login to our servers for doing the R&D of the issue.
SAP notes are the update information in SAP, frequently released by SAP.
It is SAP's method of Online Support System.
OSS notes are online documents published by SAP in their web site 


http://service.sap.com, aimed to take care of the following:


- Product errors
- Product modifications
- Product upgrades
- FAQs
- Consulting notes
- Customizing notes etc.
The notes contain, among other things, program corrections, methods for table/field additions, deletions /corrections, customization changes etc.
Once in a year or so, SAP comes out with upgrades which will include many of the notes issues between the provious upgrade and once being issues.
Certain notes (which are limited to code correction) can be implemented in a simple way using transaction SNOTE.
Other notes which include customization changes , field/table corrections need to be implemented manually.


If you have the access you can view from http://service.sap.com


OSS notes are the corrections and suggestions given by SAP for standard objects(Like programs, Function modules).


Oss notes provide either information or corrections to the customer.
Some notes contain critical information about the component and have to be used in addition to the component guides that are delivered to the customer.
Some other notes provide corrections to the code as a fix before a support package is released. The subsequent SPs contain the corrections that were delivered through notes before.  Hence it is important to check the current SP level of your system and the SP level with which the corrections come before applying the notes.
Some notes provide just manual corrections (in which case the procedure to make the manual corrections also need to be specified in the notes) and other provide automatic corrections (which are applied through TA SNOTE).
The notes can be searched or downloaded at http://service.sap.com/notes

CIN configuration in SAP SD

CIN configuration in SAP SD In his video you will see the concept of CIN and step by step Configuration in SAP SD Also see ...