This article explains the step by step, a simple and effective trick to do mass updates/creations on SAP configurations. In many cases this can potentially save couple of days. Conceptually it is very simple. Many IT professionals know how to use mail merge. For an SAP consultant, BDC is not a news. This will explain the steps to create a BDC session using recording and mail merge. 1. Prepare the dataFirst step is to prepare your data. It is easy to explain using an example. We will use IMG configuration for MRP Controller. We will use Name and telephone field of the MRP controller. The data to be created will be created as an excel sheet. Let us save this file as mrpc.xls

Next step is to create the recording. Before proceeding, decide your naming conventions. This will help you in troubleshooting and analysis. We will be creating 3 files, The basic recording as a text file The mail merge document as a word document Finally the merged bdc session as a text file. I use r_xxxx .txt (xxxx tcode or some other meaningful name) for basic recording, mm_xxxx.doc for the mail merge document and bdc_xxxx.txt for the merged session. To create the recording, you need to know the tcode. Most of the consultants are used to navigating using menu. Some experienced consultants know the tcodes by heart. It is easy to find the tcode. In the IMG screen>Additional Information>Additional Information>Display Key>IMG Activity. This will display the tcode of the specific IMG activity.

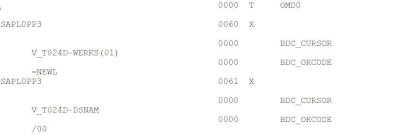
Another point before actually proceeding to create the recording, it is better to create one MRP controller normally to create the transport request. If the transport request is already created or if you can create the transport request manually then this is not required. Create the recording using the tcode SHDB. IN SHDB>New Recording, enter recording name and the tcode OMD0. Click Start Recording. You will get the actual MRP Controller maintenance screen. Create a new MRP Controller. When the transaction is completed, you will see the recording in the SHDB screen. Export the transaction to the desktop as a text file r_OMD0.txt. Next step is to prepare the mail merger document. Open r_omd0.txt in ms word. You will see the text wrapped in 2 lines looking clumsy.

Not to worry. Select File>page Setup. Choose paper size A3, orientation landscape and all margins as 2.5cm. EDIT>Select all and change font size to 6. If the display is very small, change zoom setting to 150%.

2. Mail Merge With the file in the MS Word, select menu option tools>mail merge. Click on create and select form letters. Select active window to use the current document. The Get data button will become active now. Click get data>open data source and select your excel file you created in step 1 (mrpc.xls). A window will appear with the button
3. Run the Update Login to configuration client and run tcode SHDB>new recording. Enter a name in recording field and leave the transaction code field blank and click on green tick. Click on icon to import the recording. In the file open dialog select the text file created in step 2 (md_omd0.txt). Click


No comments:
Post a Comment